
Classic Volks · Restoration & maintenance
A little know-how.
A lot more Volks.
Looking after an aircooled Volkswagen, getting to know its workings or planning a restoration? Start with the guides and reference information below.
Explore the guides ↓Get to know your VW
Maintenance & practical guides.
Choose a topic to open the guide. Models, engines and previous modifications vary: use the workshop manual for your particular VW to confirm procedures, specifications and settings.
Battery care & inspection
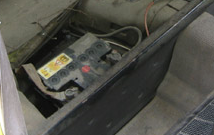 Battery maintenance consists of checking the electrolyte level (amount of liquid)
of each cell to ensure that the separators are covered by ¼ inch of electrolyte. If the level has fallen, top up the battery using
distilled water. Please don't use normal water and do not overfill. If a battery is overfilled or any electrolyte spilled, immediately wipe away
the excess as it corrodes any metal it comes into contact with very quickly.
As well as keeping the terminals clean, the top of the battery and especially the top of the cells should be kept clean and dry. This helps prevent corrosion and ensures that the battery does not become partially discharged by leakage through dampness and dirt. Tip: - Once every three months, remove the battery and inspect the battery tray area (and leads) for corosion - look for white fluffy deposits on the metal which are brittle to touch. If any corrosion is found in the tray area, clean off the deposits with ammonia then clean and paint with an anti-rust / anti-acid paint. At the same time inspect the battery itself for cracks.
Front wheel bearings: Type 181

Like many jobs on keeping your Classic VW maintained; you can easily do it yourself
with only a gentle learning curve to undertake. On that note, we thought we'd share a recent task, that of greasing the front left outer wheel bearing on our Type 181 Trekker - If you own one or a Beetle, or Campervan
then there won't be much difference so this introduction should help. There're actuall two (inner and outer) but I'm giving you enough to get you started.
Tools for the job: Large adjustable wrench, Gloves (optional),
Hex/Allen Key (size 6), Correct Grease type (i.e. read the label).
So, let's crack on. Make sure that your car is parked level, block the rear wheels to prevent it rolling then jack the car up
and I recommend using suitable jack stands to support the vehicle and as you see by the first picture (image 1.), first step is getting the front wheel off.
The dust cap (image 1.) can be seen and needs removing (look out for a small retaining clip) - so I gripped it with calipers and used a hammer for gentle persuasion.
 Once the dust cap was off, it was time to reach for the
Allen key to undo the screw holding the retainer ring nut encountered, then the wrench for the actual nut (Image 2.) which
surprisingly turned clockwise to undo it. Behind the retainer ring is a washer which needs removing and which comes off easily either with a flat head screwdriver or
something similiar simply to tease it towards you. And once that's removed, presto! - there's the rather small 'outer' wheel bearing. You'll want to be careful
to keep the bearing and the area it lives free from harmful bits and pieces. Basically you don't want to introduce any bits of metal or rubbish into the bearing or its' surrounding
components. Clean the bearing and its' housing area as best as you can/want. The choice of grease needs to be suitable for the wheel bearing - some types aren't so check first before using whatever
grease you have/bought. Don't be shy with how much grease you pack on/in the bearing and into the bearing housing area.
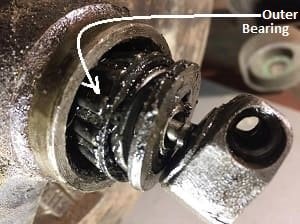 You can also make sure the spindle is clean as well. Grease the bearing in globs of
grease until you see it coming out of it, and put grease inside the hub. When I was happy with the initial cleaning then packing with grease,
it was simply time to put it all back together (I wasn't worried about the inner bearing but you should do both inner and outer).
The retainer ring /nut was soon back on the spindle and tightened 'by hand until it wouldn't go anymore. Spin the rotor
or drum a few times back and forth and then tighten the nut more by hand to help get the bearings seated. Do it a couple of times until you can't get it any tighter by hand.
Now tighten the nut ¼ turn, no more than 16 foot-pounds. Put a small blob of grease on the inside of the dust cap and tap it into place, being careful not to crush it.
That's it, job done!
Aircooled & watercooled explained
 To be fair, all engines are technically air-cooled because even water-cooled engines use air to cool
the fluid in the radiator but you're probably here because of an interest in Volkswagens and that being the case
you're likely to have heard the term 'Aircooled' and or 'Watercooled' in conversations. Not sure what they mean? Well the simplest way to grasp the difference
is to note that Air-cooled engines do not require a radiator, the Aircooled engine is designed so that air circulates over and around
hot parts of the engine and keeps it 'cool' as you drive.
Most modern internal combustion engines are cooled by a closed circuit carrying water (get it; Watercooled) or now mainly liquid coolant through channels in the engine block and cylinder head, where the coolant absorbs heat, to a heat exchanger or radiator where the coolant releases heat into the air. Thus, while they are not ultimately cooled by the liquid, because of the liquid-coolant circuit they are known as water-cooled. In contrast, heat generated by an air-cooled engine is released directly into the air.
The air-cooled engine has had a long and well-loved history. At least if you're talking to us. In the 1960s and 1970s some car makers used air-cooled engines to power their vehicles. The 1964 Porsche 911 may be one of the fastest air-cooled engines, but the Volkswagen air-cooled engine may be one of the most beloved. It was used in the original Beetle. Now while you'd be hard-pressed to find an air-cooled engine rolling of the auto assembly line these days, but that doesn't necessarily mean they're anywhere near dead. If you hop on a motorcycle you're probably experiencing an air-cooled engine (although some motorcycles are liquid-cooled) but it's aircraft that have had the longest running air-cooled track record because many helicopters and small planes have remained air-cooled right from the beginning.
Changing your engine oil
Changing the oil in your Aircooled volkswagen
 Foreword The aircooled
VW engine runs hotter than a water cooled engine, and so it gives the oil a harder workout and even greater significance
in engine wear n tear. Changing the oil regularly is the best preventive maintenance you can give your VW engine given that
over time, the oil becomes diluted and contaminated, leading to premature engine wear. If you pull that dipstick out to
check the oil say every other you fill-up, then a low oil condition should never occur. If it does, you could have a serious
leak from the crankcase/engine which will need your urgent attention.
TOOLS REQUIRED FOR THIS JOB
- A 10mm - ⅜"- drive ratchet and appropriate sockets.
- New oil filter kit
- Gearbox Sump plug socket (17mm) for VW Beetle 1946 to 1998)
- Something suitable to drain off the oil into for disposal.
- Oil filter & fitting kit for your year.
- No more than about 2.5 litres of new Oil. Do not over fill.
Get familiar with the task!
 There's nothing like being prepared for a job. So why
not have a look first at the nuts and type of sump plate on your dub first as there are variations depending of the age of your Volkswagen and you may need other
tools not listed above. Our 1969 Beetle has a round plate with six bolts around the outside - a larger bolt in the middle. Check yours out. Pre 1973 Volkswagens
are a dream for oil changes. So you've got the tools you need, the engine isn't cold, then the first step to an oil change is draining the old oil out.
Crawl under your car if it's still not far off stock height, or raise it up a little if not, but not to such an angle that the oil won't completely drain out (when you get to that stage). Look at the bottom of the engine case, right in the center, and you should (model depending) see a round metal plate. This is the oil sump plate. It is held to the engine case with a number of very small nuts. Your car may or may not have a large bolt in the middle of the plate (pre 1973 models are a dream for oil changes). If it does, you're lucky -- the large plug in the middle of the sump plate makes it easier to drain the oil.
Get ready with the container to catch the oil, then Loosen the centre nut, a little at first, then all the way out when you have everything in place as the oil begins to drain out. It will probably take about 15minutes for all the oil to drain fully; maybe get it going and make a quick brew? If after 15 minutes there's still oil draining out - give it a little more time. The more of the old dirty oil that drains out the better. With the oil drained (keep some newspaper or cardboard for drips) and the container it's in out of the way, unscrew the 6 bolts around the filter plate. There's a good chance that the filter plate will be stuck so carefully pry it off - the plate may bring the old filter out with it, if not, pull it out. If there isn't a filter in there, quietly sigh at the previous owner while stroking and promising your dub that you won't neglect it in this way.
You'll by now have a good understanding of the parts you are looking at, and if you review the items in the new kit you'll see what you are replacing in parts before the end when you replace the oil itself.
Meet the Type 3 Volkswagen
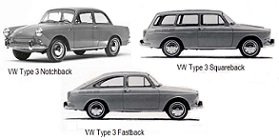 You could be
lucky enough to already own one; on that note, if you do, then we'd love to hear from you - pictures too please. For this article, we're using terms and
associations common to the UK market. The Type 3 diversified Volkswagen's range of products. The Type 1 (or Beetle) you probably already know, the Type 2
(known often as the 'Microbus', informally as a 'Bus' or 'Camper') you are also likely to have seen or heard of. Well the Type 3 was manufactured and
marketed by Volkswagen from around 1961 to 1973. Some know it as the Volkswagen 1500 (later 1600) and comes in three body styles: the VW Type 3 'Notchback'
(1961 onwards), the Type 3 'Fastback' (1965 onwards) and the Type 3 'Squareback' (or station wagon - 1963 onwards). All three retain their engineering
principles i.e. the air-cooled engine, rear-engine, rear-wheel drive layout. A notable change from the Type 1 however, was the front suspension.
Checking your oil level
One of the absolute best and easiest thing you could ever do to help restore and keep your aircooled volkswagen at its optimal running condition, is to often check the oil level so that you never run the engine with too little or too much oil in it. On this topic, be sure to change the oil at intervals no greater than every 3000 miles driven. We want to leave nothing to chance, so below we have listed six straight-forward steps on how to check the oil level.
- 1. Run your aircooled VW engine until its 'warmed up' and then turn of the engine.
- 2. Wait for about 5 minutes after switching off to allow the majority of the oil to drain down to the crank case.
- 3. Pull out the dipstick and clean with a rag - be careful, it may be hot!
- 4. Insert the dipstick back in - all the way.
- 5. Remove the dipstick again and look at where the oil level is up to. There should be 2 marks on the dipstick, the oil should be between the two, the bottom one is the minimum level and the top one is the maximum.
- 6. If the oil level is less than halfway, add some oil to bring the level up - being careful not to spill any, if you do, be sure to clean them. Also DO NOT OVERFILL.
Understanding the ignition coil
 The ignition coil (also called a spark coil) is a type of induction coil - meaning it's a type of
electrical transformer which can produce high-voltage, from a low-voltage supply. The ignition coil
in an automobile's ignition system, such as that of your beloved aircooled volkswagen, transforms the battery's low
voltage to the thousands of volts needed to create an electric spark
in the spark plugs to ignite the fuel.
Here's a bit of trivia: There is one ignition coil in the older VW models that sends the spark to a distributer, (which then sends the spark to the waiting spark plug). Newer Volkswagen cars, however, have one ignition coil for every spark plug. Look out for: - problems during startup, engine hesitation, backfires as possible indicators of a faulty ignition coil. Get your local experienced dubber or trusted mechanic to fully diagnose the fault.
Ignition coil fault symptoms
Ignition coils are very rugged and reliable but they can of course fail - for a variety of reasons. One of the number one reasons that ignition coils fail is voltage overload, caused by bad spark plugs and/or plug wires/leads. You'll need a more indepth test done to know for sure, but a faulty coil can cause any or all of these symptoms.
- Backfiring - or Misfiring can indicate early symptoms of an ignition coil failure. A faulty ignition coil causes the spark plug to partially ignite, leaving extra air and fuel in the system...excess or unused fuel seeps through the exhaust system. If you do not address the issue, you can also do serious damage to your exhaust. Your exhaust may emit a black smoke and you may even detect the smell of gasoline.
- Startup Problems Difficulty starting the car is a huge indicator of a faulty ignition coil. When the ignition coil is not working properly, it may not supply enough power to the spark plug.
- Stalling Although vehicles occasionally stall, frequent stalling is a tell-tale sign of ignition coil failure. A faulty ignition coil causes the spark plug to ignite irregularly, which can cause the car to shut down when it stops.
A useful starting point
Aircooled engine codes.
Use this reference alongside the number stamped on your engine case. An engine may have been replaced or rebuilt, so its code alone won’t confirm its current specification.
M240 refers to the optional low-compression engine and the type of pistons fitted.
| Code | Size | VW Model | Vehicle Year Referenced | Notes | Extra info |
|---|---|---|---|---|
| A | 1200 | Type 1 | up to July 1965 | (1192cc 30hp) |
| B | 1600 | Type 2 | August 1967 - July 1970 | . |
| 1600 | Type 1 | August 1968 - July 1970 | (USA) | |
| C | 1600 | Type 2 | August 1967 - July 1970 | (M240) |
| D | 1200 | Type 2 | from May 1959 | (1192cc 34hp) |
| 1200 | Type 1 | August 1965 | (1192cc 34hp) | |
| E | 1300 | Type 1 | August 1965 - July 1970 | |
| F | 1300 | Type 1 | August 1965 - July 1970 | |
| G | 1500 | Type 1 | August 1965 - July 1970 | |
| H | 1500 | Type 2 | August 1965 - July 1968 | |
| 1500 | Type 1 | August 1965 - July 1970 | ||
| 1500 | Type 181 | August 1969 - February 1971 | aka Kurierwagen, Trekker, Thing | |
| K | 1500 | Type 3 | August 1965 - October 1973 | notchback, fastback & station wagon |
| L | 1500 | Type 2 | from November 1965 | |
| 1500 | Type 1 | August 1966 - July 1970 | M240 | |
| M | 1500 | Type 3 | August 1965 - July 1973 | |
| N | 1500 | Type 3 | August 1965 - July 1973 | M240 |
| P | 1600 | Type 3 | August 1965 - July 1973 | M240 |
| R | 1500 | Type 3 | August 1963 - July 1965 | 1500S |
| T | 1600 | Type 3 | August 1965 - July 1973 | |
| U | 1600 | Type 3 | from August 1965 | fuel injection |
| UO | 1600 | Type 3 | from August 1967 - July 1973 | |
| AB | 1300 | Type 1 | August 1970 - July 1973 | |
| AC | 1300 | Type 1 | August 1970 - July 1975 | M240 |
| AD | 1600 | Type 1 | August 1970 - July 1973 | |
| 1600 | Type 2 | August 1970 - July 1973 | ||
| AE | 1600 | Type 1 | August 1970 - July 1971 | USA |
| AF | 1600 | Type 1 | August 1970 - January 1980 | M240 |
| 1600 | Type 2 | August 1970 - July 1979 | M240 | |
| 1600 | Type 181 | January 1974 - January 1982 | M240 | |
| AG | 1600 | Type 181 | August 1970 - July 1976 | |
| AH | 1600 | Type 1 | August 1971 - January 1976 | USA |
| AJ | 1600 | Type 1 | August 1974 - December 1980 | USA & Japan | fuel injection |
| AK | 1600 | Type 1 | August 1972 - July 1973 | USA |
| AL | 1600 | Type 181 | March 1973 - July 1979 | USA |
| AR | 1300 | Type 1 | August 1973 - July 1973 | |
| AS | 1600 | Type 1 | August 1973 - July 1980 | |
| 1600 | Type 2 | August 1973 - July 1979 |
Electrical reference
Beetle wiring diagram.
1500 Volkswagen Sedan and Convertible, U.S. version, August 1967–July 1969. Check that the diagram matches your vehicle and any changes made to its wiring.
 Open the full-size wiring diagram ↗
A few common questions
Before you get started.
How can I tell my VW engine size and Engine code?
Variations of the Volkswagen aircooled boxer engine (with four horizontally opposed cast-iron cylinders etc.) were produced worldwide and did you know, widely used in industrial, light aircraft and kit car applications. Engine size & code table.
Where is the battery in my '69 VW Beetle?
The Battery for your Volkswagen Beetle is positioned under the back seat and you'll need to first lift the seat up/out to see it. There should (age dependent) be a strap and cover to first remove, be sure to do this carefully as it's all too easy to cause an accidental short circuit when doing so.
How do I remove the battery?
..Continuing from above. Start first with the earth/Negative terminal - unclamp it from the battery, then release the positive terminal, and lift the battery out vertically, so as not to risk fluid (electrolyte) spillage. With the battery now out, take care to prop the rear seat up as it's possible cause a fire via a short circuit, if the springs on the seat make contact with the terminals.
It's a good idea to clean any corrosion or deposits from both terminals and clamps and before reconnecting, many smear petroleum jelly (never grease) on the terminals. Hope this helps.
Why does the brakes feel 'spongy'?
If you find that the brake pedal of your beloved Volkswagen feels 'spongy' when applied, there's a distinct possibility that air is present in the hydraulic system.
Ask us how if you aren't sure, but you'll need to do what's known as 'Bleeding' the hydraulic system. Check for signs of leakage (of brake fluid).
If you find that the brake pedal travels a long way before the brakes operate, have the brake shoes adjusted as it's possible they are set too far from the drums.
How do I convert from a 6Volt to a 12Volt system?
For one thing, 12-Volt kits are widely available and usually come with instructions (including a wiring diagram) to help you out. Ensure the kit you opt for includes an alternator (and alternator strap), a regulator, a stand and a backplate, and consider too that you may need to change the fan belt size. You could also get a 12-volt generator instead of an alternator but an advantage of the alternator is that it charges at lower RPMs.
Other things to bear in mind is that you'll need to change the battery, flasher relays and bulbs (tail-lights, headlights and so on), the coil will need to be changed and the choke element too. What else? - oh, install a resistor for the wiper motor, and install a new adapter bushing.
The 6-volt starter you currently have from what we've seen, works in the 12-volt system though there are some debates on this. Many people we've spoken with stick with the 6-volt starter.
We always suggest you discuss making changes to your VW with those who've spent years owning and working on them, and what we've shared here isn't the full story, but covers many aspects of the conversion. If you want to get a more personalised advice on this subject, simply email us your details.
Why won't it start?
Note:This section offers advice only. Read through first and be honest about your level of confidence before attempting anything.
Well it may sound silly, but if your Volkswagen won't start - first does it have any petrol (gasoline) in the tank? If there isn't another option (no fuel gauge or non-working gauge), take the petrol cap off and rock the vehicle as you listen for a swishing noise to give you an audible indication of whether or not there is any petrol (or an idea of how much/little) in your car.
Got fuel and still won't start? - Then maybe its the coil and/or choke connections. So open the engine compartment and have a look at the three wires that attach to the coil (that cylindrical thing attached to the fan housing). Test that the big centre wire is firmly in its socket. Push the other end into the distributor cap while you are at it. Also ensure the the other two wires are securely connected, not loose. Usually they are 'push connections' - has one fallen off? If so, push it back on. There's also a typically a thin wire running from the coil to the distributor - make sure that's connected.
Still won't start? Pick up from where you left off. On the right hand side of the carburettor(s) is a wire that should be attached to the automatic choke; it can often come loose and 'grounds', robbing the current from the coil. Still won't start?
At this stage we'd remind you to review your level of competence; your safety is our concern. Consult with experienced mechanics. Ask them to check the number 15 fuse. If it's blown you'll need to replace it. We try to encourage a self-help approach to fixing your VW problems, but we assume our readers will take care and due responsibility to what they will or won't try.
Need a helping hand?
Find the right help for your VW.
Looking for help with a restoration or a job you’d rather leave to a specialist? Email me with your location, your VW’s model and year, and the work you need.
Ask Kate about a specialist →Aircooled servicing in York
For local servicing and workshop enquiries, see the Classic Volks garage page.
Explore garage services →Another restoration resource
For VW businesses
Share what you do.
Run an aircooled VW restoration, repair or specialist business? Get in touch about advertising on Classic Volks.
View advertising options →More help & inspiration